Wednesday, September 16, 2009

Reddit, the Popular Social Bookmarking Tool changes Layout

Reddit, Popular Social Bookmarking ToolReddit, the Popular Social Bookmarking Tool has changed its interface from today. It has almost been four years that the reddit was on the very normal and say white interface. Now as they have been more popular and have been attracting more visitors daily, they thought to change the interface and finally the have done it. Well, to me i think, they have been just lured by the Digg's layout or interface and simply have adopted that. But ya it looks great. the green and blue reddit is best then the previuos white and blue.
Well you can have the look at the pic below or just visit the site http://www.reddit.com/ to see their new look.


For those who have been using reddit previusoly and found the previuos outlook better, they can still see the old one at http://classic.reddit.com/.

Reddit, Popular Social Bookmarking Tool  Layout

For complete details on why they have chnaged you can read their blog at http://blog.reddit.com/2009/04/long-overdue-update.html.
Thanks for reading and keep using reddit. what do you think about the new interface ?? Add comments if you really like the new interface or even find the previuos one wonderful.

Related Posts Widget for Blogger / Blogspot

Related Posts Widget for BloggerBlogger widget “related posts” in blogger or blogspot blog is one of the blogger tools that help to add related articles to each of your blog posts. Related posts are selected according to your category, label or tag that you add to categorize your blog post. Related posts widget helps to increase your page visits by making users to discover other similar user interested topic posts from your blog, thus making your blog more user friendly. This Related posts hack is really useful tool for your blog that can help you to make your blog professional and at the same time can keep users for a long span of time on your blog. Below is a step by step manual instruction or blogger hack on adding “related posts widget” to your blog.


Follow the below steps properly and in order to have the similar widget you see in the pic above.

Widget Adding Instructions:

1. Go to Blogger Dashboard - click Edit Layout - then click Edit HTML
Wait: Before Editing your Template, Save a copy of your current template by clicking 'Download Full Template' in 'Edit HTML' page of the Blogger 'Layout' Window and 'Preview' the changes before Saving.


2. Check the ‘expand Widgets Template Box” as shown in the figure below.

Check widgets Template Box

3.Then Search (Ctrl+F) the code given below in your template:
</head>


4. Copy and Add the code given below just before the above line:


<style>

#related-posts {
float : left;
width : 540px;
margin-top:20px;
margin-left : 5px;
margin-bottom:20px;
font : 11px Verdana;
margin-bottom:10px;
}
#related-posts .widget {
list-style-type : none;
margin : 5px 0 5px 0;
padding : 0;
}
#related-posts .widget h2, #related-posts h2 {
color : #940f04;
font-size : 20px;
font-weight : normal;
margin : 5px 7px 0;
padding : 0 0 5px;
}
#related-posts a {
color : #054474;
font-size : 11px;
text-decoration : none;
}
#related-posts a:hover {
color : #054474;
text-decoration : none;
}
#related-posts ul {
border : medium none;
margin : 10px;
padding : 0;
}
#related-posts ul li {
display : block;
background : url("http://i299.photobucket.com/albums/mm297/zozuglogger/weed-bullet.gif") no-repeat 0 0;
margin : 0;
padding-top : 0;
padding-right : 0;
padding-bottom : 1px;
padding-left : 16px;
margin-bottom : 5px;
line-height : 2em;
border-bottom:1px dotted #cccccc;
}

</style>
<script src='http://bloggeruserutilities.googlepages.com/Related_posts_hack.js' type='text/javascript'/>


5. Again Search(Ctrl+F) the code given below (or similar) in your template:
<p><data:post.body/><p>


6. Add the code given below just after the above line

<b:if cond='data:blog.pageType == "item"'>
<div id="related-posts">
<font face='Arial' size='3'><b>Related Posts : </b></font><font color='#FFFFFF'><b:loop values='data:post.labels' var='label'><data:label.name/><b:if cond='data:label.isLast != &quot;true&quot;'>,</b:if><b:if cond='data:blog.pageType == &quot;item&quot;'>

<script expr:src='&quot;/feeds/posts/default/-/&quot; + data:label.name + &quot;?alt=json-in-script&amp;callback=related_results_labels&amp;max-results=5&quot;' type='text/javascript'/></b:if></b:loop> </font>
<script type='text/javascript'> removeRelatedDuplicates(); printRelatedLabels();
</script>
</div></b:if>


7. Save your Template. That’s it.

Widget Customization

Customize Blogger WidgetYou can change the number of maximum related posts being displayed, search for the code below (within the code given in step 6) and change the number "5" to any desired number. Its good to have related posts in accordance with the space available to display. Generally, five posts is enough. However, you may display the number of posts you like.
max-results=5


Widget Use and Summary

This widget is not only important widget for making your blog look professional but also an important widget to help your blog users to quickly navigate on another important and related post.

Help and Comment

Help and comment BloggeruserIf you have any problems or any queries related to this widget, Please leave a comment below and I would be glad to help you !
Meanwhile, you can also visit "Related posts by category Blogger widget" for a similar widget.
Also I want to know your view about this widget. So Comment !

Recent posts Widget for Blogger / Blogspot

Recent posts Widget for Blogger / BlogspotRecent posts widget in your blogger blog is a useful and must have widget. Many bloggers use this widget to display the recent posts in their side bar or footer of the blog. No matter where you use but this widget will certainly help your users to explore latest updated posts in your blog. This blogger Widget is essential if you are displaying just one or two posts in your home page. And the most important thing, I think to display this widget is that users on post pages of any date can explore your recently updated posts through the same page. So, it’s indeed essential that you display this widget in every pages of your blog. Now let’s learn how to add this widget to your blog.


Widget Adding Instructions:

Follow these simple steps to get this widget on your blog.

1. Login to your Blogger Dashboard

2. Click on the blog’s Layout on which you want to add this widget

3. click Add a Page Element on spot you want to add this widget

4. Add a Feed (click “add to blog” under the page element Feed)

5. After the pop up box appears follow the below steps to configure

a. Enter your blog’s feed URL in the box. Use the URL below.

Just replace the text indicated in red with your own blog address. http://yourblogurl.blogspot.com/feeds/posts/default?alt=rss

or

http://www.yourblogurl.com/feeds/posts/default?alt=rss
(for self-hosted blogs)
b. Click Continue.
Widget Customization

Customize Blogger Widget
Change the Title to “Recent Posts” or “Recent Entries” or whatever you prefer to call it. You can also choose to show the item dates and author. Also choose to display number of posts according to your choice.
Widget Use and Summary

This widget will certainly add an important feature to your blog. This also helps for one thing, it will increase your page view too because people will certainly explore your latest posts if they like the conent they are reading on the post pages.

Help and Comment

Help and comment BloggeruserIf you have any problems or any queries related to this widget, Please leave a comment below and I would be glad to help you !You can also comment if this widget has really helped you as i said.

Related Posts by Categories; Blogger Widget

Related Posts by Categories; Blogger WidgetBlogger/ Blogspot widget “Related posts by categories” shows related posts according to user defined categories at the end of each post. Another widget “Related posts widget for blogger” displays only a list of related posts but this widget shows posts under different labels, categories or tags. You can display desired posts under desired categories and also can specify the number of posts to display in your blogger blog. Needless to say, this widget will help your blog users to explore more related posts under the categories they are interested in.
Follow the specific instructions below to add this hack widget to your blog.


Follow the below steps properly and in order to have the similar widget you see in the pic above.

Widget Adding Instructions / Steps:

1. Go to Blogger Dashboard - click Edit Layout - then click Edit HTML
Wait: Before Editing your Template, Save a copy of your current template by clicking 'Download Full Template' in 'Edit HTML' page of the Blogger 'Layout' Window and 'Preview' the changes before Saving.


2. Check the ‘expand Widgets Template Box” as shown in the figure below.

Check widgets Template Box

3.Then Search (Ctrl+F) the code given below in your template:
<data:post.body/>


4. Copy and Add the code given below just after the above code:

<b:if cond='data:blog.pageType == "item"'>
<div class='similiar'>

<div class='widget-content'>
<h3>Related Posts by Categories</h3>
<div id='data2007'/><br/><br/>
<script type='text/javascript'>

var homeUrl3 = &quot;<data:blog.homepageUrl/>&quot;;
var maxNumberOfPostsPerLabel = 4;
var maxNumberOfLabels = 10;

maxNumberOfPostsPerLabel = 100;
maxNumberOfLabels = 3;


function listEntries10(json) {
var ul = document.createElement(&#39;ul&#39;);
var maxPosts = (json.feed.entry.length &lt;= maxNumberOfPostsPerLabel) ?
json.feed.entry.length : maxNumberOfPostsPerLabel;
for (var i = 0; i &lt; maxPosts; i++) {
var entry = json.feed.entry[i];
var alturl;

for (var k = 0; k &lt; entry.link.length; k++) {
if (entry.link[k].rel == &#39;alternate&#39;) {
alturl = entry.link[k].href;
break;
}
}
var li = document.createElement(&#39;li&#39;);
var a = document.createElement(&#39;a&#39;);
a.href = alturl;

if(a.href!=location.href) {
var txt = document.createTextNode(entry.title.$t);
a.appendChild(txt);
li.appendChild(a);
ul.appendChild(li);
}
}
for (var l = 0; l &lt; json.feed.link.length; l++) {
if (json.feed.link[l].rel == &#39;alternate&#39;) {
var raw = json.feed.link[l].href;
var label = raw.substr(homeUrl3.length+13);
var k;
for (k=0; k&lt;20; k++) label = label.replace(&quot;%20&quot;, &quot; &quot;);
var txt = document.createTextNode(label);
var h = document.createElement(&#39;b&#39;);
h.appendChild(txt);
var div1 = document.createElement(&#39;div&#39;);
div1.appendChild(h);
div1.appendChild(ul);
document.getElementById(&#39;data2007&#39;).appendChild(div1);
}
}
}
function search10(query, label) {

var script = document.createElement(&#39;script&#39;);
script.setAttribute(&#39;src&#39;, query + &#39;feeds/posts/default/-/&#39;
+ label +
&#39;?alt=json-in-script&amp;callback=listEntries10&#39;);
script.setAttribute(&#39;type&#39;, &#39;text/javascript&#39;);
document.documentElement.firstChild.appendChild(script);
}

var labelArray = new Array();
var numLabel = 0;

<b:loop values='data:posts' var='post'>
<b:loop values='data:post.labels' var='label'>
textLabel = &quot;<data:label.name/>&quot;;

var test = 0;
for (var i = 0; i &lt; labelArray.length; i++)
if (labelArray[i] == textLabel) test = 1;
if (test == 0) {
labelArray.push(textLabel);
var maxLabels = (labelArray.length &lt;= maxNumberOfLabels) ?
labelArray.length : maxNumberOfLabels;
if (numLabel &lt; maxLabels) {
search10(homeUrl3, textLabel);
numLabel++;
}
}
</b:loop>
</b:loop>
</script>
</div>

</div>
</b:if>


5. Save your Template. That’s it.

Widget Customization

Customize Blogger WidgetYou can change the number of maximum related posts being displayed, search for the code below (within the code given in step 4) and change the number "3" to any desired number. Its good to have related posts in accordance with the space available to display. Generally, two or three categories is enough. However, you may display the number of categories and posts as you wish.
maxNumberOfLabels = 3;


Widget Use and Summary

In conclusion, this widget is not only an important widget for making your blog look professional but also an important widget to help users to quickly navigate or move on to other important and related posts.


Top 10 Google Services for Blogger users

Google BloggerIn a sentence, “Google owns blogger”. Ok, so the giant internet Industry Google is behind the blogger you use. It’s really a matter of great thing probably because of the reasons which we shall be discussing ahead in this blog post.First of all, let me make you aware most blog’s future relies upon the giant search engine “Google”. After all it’s the only most popular search engine that drives the most traffic to your blog. And also the page rank which most bloggers take care of is determined by the same Google. Well, these are just simple examples of why Google connection to the blogger is important. The most important thing why Google is important to your blog is that Google owns a lot of services which in many ways are very important to enhance and enrich your blog and blogging career.

Discussing some very important Google services and the ways we can use them to enrich our blogger blog can be really useful. So here are the Top 10 services from Google that you use to make the most of blogger.

1. Google Webmaster services:

Google webmaster services are crucial for blogger blogs. You can have more visibility in search engines with the proper use of this Google service. You can submit your site and sitemap to this Google webmaster service. You can also know how many pages or links of your blog are indexed in the Google search and much more. For details on using this service and other important tasks you can perform, you can read another blog post, “Google Webmaster for bloggers”.

2. Google Analytics:

With Google analytics, you can track all the details of blog visitors. You can have all details of your page views, unique visitors, site referrers, bounce rate and much more. You need not use any other stats counter if you use the Google analytics and even using this is simpler than using any other counter codes. You can use this service and know more about this on another blog post “Google Analytics for Bloggers”.

3. Google Docs:

Bloggers can easily create documents, spreadsheets and make presentations through this Google service. One more thing this Google Docs is helpful for bloggers is that they can directly publish their created documents to their blog.

4. Google Feedburner:

Feedburner is the most important tool for bloggers. It has not been much google realized its importance and made it own. It is a pompous online web content feed management program. Almost all bloggers use this tool to easily let other bloggers subscribe their blog content. The most advantageous thing is that your blog users can easily subscribe your latest content via email. This will certainly help to increase your blog readers. You can know more on using Feedburner in our post “Feedburner for Bloggers”.

5. Google Adsense:

If you are really interested in making money through blogger, then you need to go for the Adsense program seriously. You will be finding a lot posts in this blog about the Google Adsense and the ways you can benefit through it. Well, Blogger is also making the use of Google Adsense easy for bloggers and there is not too much to do to get started with it. You can learn more in general about the adsense program through our post “Adsense for Bloggers / Blogspot”.

6. Google Earth:

Using Google Earth really makes it easy for bloggers to create required maps for them.

7. Google Reader:

If you want online feed reader, Google Reader can be a good choice. You can subscribe to Blogs via Google Reader and follow them too. You can learn in detail about this program in our post “Using Google Reader for Bloggers”.

8. Google You Tube:

With this most popular video website, you can create videos and embed them directly in your blog. You can also search for the videos you need for your blog and use them directly. Most importantly you can help other bloggers by video blogging through this. This will certainly help you to drive traffic to your blog and thus make your blog popular.

9. Google Picasa:

You must have noticed the photos you upload in your blogger blog are stored in Picasa account. You can use this Picasa to manage your uploaded photos and much more. Read our another post “Google Picasa For Bloggers” to learn more about this.

10. Google Groups:

Using Google Groups is really useful for your blog in terms of driving traffic to your blog by creating your own group. You can also use Google groups to share common information with similar interest bloggers. You can learn in details of using Google Groups in our post “Google Groups for Blogger”.

Conclusion:

There are also other services such as Gmail, Google Toolbar, Orkut, Google Video… which you can use along with the above listed popular Google services. All these services in a way help to make your blogging career successful.

Make a good use of all those services and also let us know why any service is most important for you. Also let us know any other popular Google services for Blogger if we have missed any.
Enjoy blogging…..

Displaying or Adding Adsense Ads in your Blogger Posts

Adding Adsense Ads in Blogger PostsAdsense Ads in Blogger posts has relatively higher CTR (Click through Ratio) and can also significantly increase the number of clicks you receive. Adding Adsense Ads along side bars or between different posts is an easy task but to place Adsense ads directly in the blog post requires some trick. Have you seen most bloggers placing Adsense ads right after the Title of the post? This is really crucial to increase your adsense earnings. But Adsense ads are not displayed if you directly add the adsense code in the blogger post or even in the template. Ok so through this method, you can add adsense in two most popular spots in blogger posts; either just below the title or at the end of the posts. You can also align them to left or right on these spots according to your need and look. In this post we shall discover how to add such Adsense ads in your posts so that you could earn more from them.

This adsense adding method is found very beneficial for bloggers to increase their adsense earnings. The idea of writing this post came to my mind when I stumbled Themelib’s article for increasing adsense earnings for better design. And the main section I can relate to the article is
Inside Blog Posts - If we display Adsense ads inside post, it is found that it has relatively higher CTR. People mostly think this ads as a part of the content and click it often. And these ads have almost related words to the topic or key words you have in your specific blog post. (Thanks CELEBSIMAGE)

Well, now let’s move on if you are really interested to add Ads in such way.
Specifically, we shall be discussing two main steps in order to add such Adsense ads style.

Widget Adding Instructions:


The first main step is to configure inline ads in blogger which is really easy.

1. Go to Blogger Dashboard - click Edit Layout

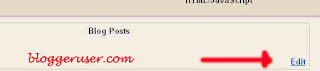
2. Click on the Edit link in the "Blog Posts' column as shown in the pic below.

Edit blog posts in Blogger

3. In the pop up window, check the box next to 'Show ads between Posts'

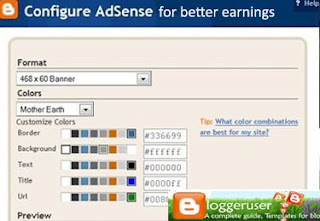
4. Now, configure the ads, choose the format, colors, etc and save it.

5. This will display the ads in between the posts in homepage, archive pages.. you can change this later if you dont wish to display in those spots.

Now follow the steps again to make the Adsense ads appear inside the content.

1. Go to Blogger Dashboard - click Edit Layout - then click Edit HTML

Wait: Before Editing your Template, Save a copy of your current template by clicking 'Download Full Template' in 'Edit HTML' page of the Blogger 'Layout' Window and 'Preview' the changes before Saving.


2. Check the ‘expand Widgets Template Box” as shown in the figure below

Check widgets Template Box

3.Then Search (Ctrl+F) the code given below in your template:

<data:post.body> or <p></data:post.body></p>


4. Now you can add the below code before the code in step 3 if you want to make the Adsense ads appear before the content or after the code in step 3 if you want to make Adsense ads appear after the content.


<b:if cond="data:post.includeAd">
<data:adend>
<data:adcode>
<data:adstart>
</data:adstart>


6. Be careful you can only add 3 AdSense for Contents on each page. So if you want to display the Adsense ads only when the blog post is explored, wrap the above code in step 4 with the below code.


<b:if cond="data:blog.pageType == &quot;item&quot;">
</b:if>


7. If you placed it properly it would look like


<b:if cond="data:blog.pageType == &quot;item&quot;">
<b:if cond="data:post.includeAd">
<data:adend>
<data:adcode>
<data:adstart>
</data:adstart>
</data:adcode>


Also note with this way the Adsense ads will also be displayed in Between different posts in blogger homepage and archive pages.
Widget Customization

Customize Blogger Widget

Customization one :

If you don’t want these ads to appear, i.e. to move built-in inline ads to within post, then locate the following block of text which is same with the one we added above:

<b:if cond="data:post.includeAd">
<data:adend>
<data:adcode>
<data:adstart>
</data:adstart>


Delete the above code from the template. Be careful ! we just added the same code so make sure you delete the existing template and not the recent added one.

Customization two:


If you still want the AdSense ad unit to appear between posts when visitors view your blog homepage, label or category pages or archive pages, wrap the code above on top and bottom with the following 2 lines:


<b:if cond="data:blog.pageType != &quot;item&quot;">
</b:if>


Customization three:


If you want to align the adsense ads to left or right please warp the parsed adsense code with the code below;

<div style='float: left;'> </div> or <div style='float: right;'> </div>


8. Click on the Save template. That's it.

Widget Use and Summary

This trick will certainly boost your adsense earnings. Well I think now you can agree to my point that Adsense earnings also depends upon the better design along with the quality content.

Help and Comment

Help and comment BloggeruserIf you have any problems or any queries related to this widget, Please leave a comment below and I would be glad to help you !You can also comment if this widget has really helped you as i said.

Recent posts Widget with images for Blogger

Recent posts Widget images BloggerAre you tired of using the recent posts widget for blogger that only displays recent post Titles with links? Here’s one new widget that displays the recent posts along with the thumbnail included in your post. Isn’t it interesting widget? Of course it is. Well, recent posts widget is the most have widget for your blog and this thumb nailed widget is more interactive to showcase your recent posts. I am sure you gonna drive some more traffic through this widget by displaying your recent posts with adjacent to the thumbnails. One more interesting thing is that if you have added recent posts widget through that RSS method, it only has the option to display up to five posts and now with this widget you can display as many posts as you want along with your desired colors and proper customization.

Widget Adding Instructions:

Follow these simple steps to get this widget on your blog.

1. Login to your Blogger Dashboard

2. Click on the blog’s Layout on which you want to add this widget

3. click Add a Page Element on spot you want to add this widget

4. Add Html/ Javascript (click “add to blog” under the page element Feed)

5. Just copy and paste this code.


<script language="JavaScript">

imgr = new Array();


imgr[0] = "http://i43.tinypic.com/orpg0m.jpg";

imgr[1] = "http://i43.tinypic.com/orpg0m.jpg";

imgr[2] = "http://i43.tinypic.com/orpg0m.jpg";

imgr[3] = "http://i43.tinypic.com/orpg0m.jpg";

imgr[4] = "http://i43.tinypic.com/orpg0m.jpg";
showRandomImg = true;

boxwidth = 298;

cellspacing = 8;

borderColor = "#ffffff";

bgTD = "#000000";

thumbwidth = 40;

thumbheight = 40;

fntsize = 12;

acolor = "#666";

aBold = true;

icon = " ";

text = "comments";

showPostDate = false;

summaryPost = 40;

summaryFontsize = 10;

summaryColor = "#666";

icon2 = " ";

numposts = 5;

home_page = "http://yourblogurl.com/";

</script>

<script src="http://bloggeruserutilities.googlepages.com/recentposts_thumbnail.js" type="text/javascript"></script>


6. Save the Widget.

Widget Customization

Customize Blogger Widget Edit the values under the following headings in the above html code to make the widget suitable for your blog. The matching colors may help you to easily distinguish to change the colors.
(Edit the values to fit your blog)

boxwidth - Width of the widget
cellspacing - Space between cells (default one is good)
borderColor - Border color (add the background color of your template to perfectly blend it in the template)
thumbwidth & thumbheight - Width and Height of the thumbnail (default are good)
fntsize - Font size of the title
acolor - Color of the title
aBold - you want bold titles? (true or false)
numposts - How many posts you want to show?
home_page : http://yourblogurl.com/ (change this to your blog url)
Please download this script ( http://bloggeruserutilities.googlepages.com/recentposts_thumbnail.js )and upload to your server or some free pages.

Help and Comment

Help and comment Bloggeruser
This widget is developed by Kranthi for her blog Blogger Tricks. Really thanks. If you have any problems or any queries related to this widget, Please leave a comment below and I would be glad to help you !You can also comment if this widget has really helped you as i said.

You may also be interested in exploring the Rss method of adding recent posts widget.